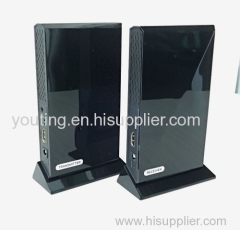


Product specifications
Model | YT-W300T | YT-W300R |
Supported Resolution | 1080p 1080i 720p | |
HDMI Interface | Support HDMI1.4A video/audio format and encrypted video format HDCP2.0 | |
Transmission Distance | 35m without obstacles | |
System Latency | <1 ms | |
Antenna | Omni bearing built-in antenna | |
Power | 100~ 240V alternating input current, 5V 3A direct current output power adaptor | |
Certificates | FCC CE | |
standard | WHDI 1.0 | |
Supported interface | 3.5mm plug,built out infrared remote control connector | Built in infrared receiving area |
Working temperature | 0℃ - 50℃ | |
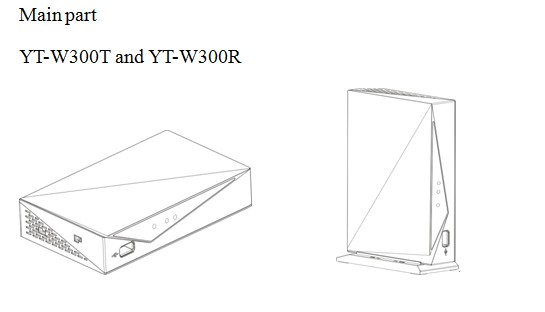
Dimension | 146(L)*93(W)*25(H)mm | |
Product Feature
- Working frequency: 4.9Hz~ 5.9 GHz
- YTS function
- Compatible design
- Built-in antenna
- With a transmission distance of 35m without latency
- Remote control
- Support 3D effect
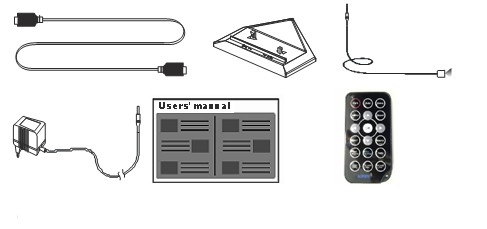
Packing Content
Please check whether the following contents are present in the package box. If any item is missed
or damaged, please contact the distributor.
Supplied Accessories:
One USB lead, 2 holding base, one infrared transmitting connector, one user manual, 2 power adaptors, one WHDI remote control.
Functions
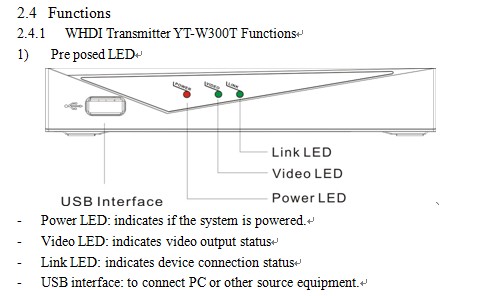
.
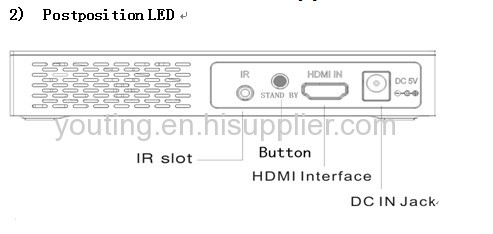
- Power interface (DC IN JACK): to connect power adaptor.
- Infrared interface(IR slot): to connect extended infrared transmitting wire
- HDMI interface: to connect HD source equipment.
- Standby button: for device registration, entering into standby mode and awakening.
2.4.2WHDI Receiver YT-W300R Functions


2.4.3 Standby mode and Awakening
1)Entering into standby mode
- Long press (more than 3s) YT-W300T, transmitter and receiver will get into standby mode.
- Long press (more than 3 s) YT-W300R, transmitter and receiver will get into standby mode.
- Long press PWR on remote control, transmitter and receiver will get into standby mode.
2)Standby mode display
After getting into standby mode, video LED and Link LED will be off, power LED will be stay on red, connection will be paused.
3)Waking up from standby mode
-Long press button on YT-W300T and YT-W300R
-Press power button on remote control and standby mode will be awakened.
Please noted: if YT-W300T and YT-W300R are both in standby mode, please long press YT-W300T and YT-W300R separately.
2.4.4 Indicating LED
Working status | TransmitterYT-W300T | Receiver YT-W300R | ||||
Power | Video | Link | Power | Video | Link | |
Normal status | ● | ● | ● | ● | ● | |
Add device | ● | ■ | ★ | ● | ● | |
Standby mode | ○ | ○ | ||||
Remarks:○ red LED stays on ●green LED stays on ★green LED flash quickly.
3 Installation


number | name | function |
1 | PWR | Standby button, available to receiver |
2 | Add | To add output devices to device list; available to receiver |
3 | Delete | To delete receiver from device list or delete character of the device name, available to receiver |
4 | MENU | To show all the items; available to receiver |
5 | Guest | Temporary visit key; available to receiver |
6 | △ | To up: available to receiver |
7 | ▽ | Down , available to receiver |
8 | ▽ | To the right ,available to receiver |
9 | ▽ | To the left,available to receiver |
10 | OK | To confirm,available to receiver |
11 | EXIT | To back/exit,available to receiver |
12 | Source | To list all the video source,available to receiver |
13 | Next Source | To select next video source,available to receiver |
14 | Pre Source | To select previous video source,available to receiver |
15~18 | Not available |
4.2 Device register and add
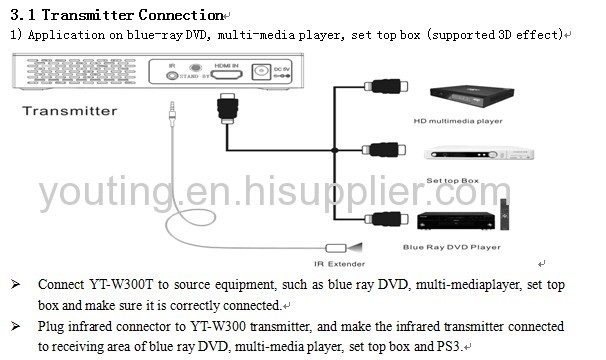
1) Connect transmitter and receiver to output equipment and display equipment separately.
2) Use the remote control on receiver terminal.
-Click "MENU" button or "Add" button to show setup interface and choose "Add new video source"
Ø "Activate registration of video transmitter unit" item will be shown on display equipment.
Ø Short press (within 1 s) register button of transmitter, and link LED flashes
Ø The receiver will show available device name and confirming information.
Ø Use WHDI remote control to press OK
Ø Display equipment will show progress bar about register.
Ø The register will complete within 3 minutes(depending on distance and surrounded environment)
Ø Network will be connected automatically and transmit audio and video signals after registration.
Ø A maximal of 8 device scan be added as the steps mentioned above.
4.3 Delete Device
Ø Press "Source" button on remote control to choose the device you want to be deleted.
Ø Press "Delete" or "MENU" to select "Remove video source"
Ø Select the device to be deleted and press "OK"
Ø After deleting the device, press "Source" to ensure the device has been deleted.
Ø Other devices can be also deleted as the above procedures
4.4 Source Devices Name Modification
Ø Press "MENU" button on remote control to show setup menu, choose "Modify video source name" item.
Ø All available video sources will be displayed and use the navigation button on remote control to locate the device name you want to be modified.
Ø Use the navigation button on remote control to locate the characters you want to be modified.
Ø Press the "OK" button to submit the new name.
4.5 Devices Connection
Ø Press "Source" button on remote control to show device list.
Ø Locate desired device on list and press "OK" button on remote control to make connections.
4.6 Disconnect Device
Ø Press "MENU" button on remote control to show setup menu and choose "Disconnect Wireless link" item.
Ø Press "OK" button to disconnect network.
Ø If the disconnection is successful, the home screen will show " Wireless off".
4.7 Video/Audio Source Equipment Cutover
Ø Make sure all devices are connected successfully.
Ø Press "Source" button on remote control to choose video source.
Ø Press "Next Source" to go to next.
Ø Press "Pre source" to go to previous video source.
Troubleshooting
Please make sure all the devices is properly connected and receiver is not in standby mode before you follow the troubleshooting guide below.
No video | 1, Check the status of LED, and check if the HD media player works normally. 2. Check if the joints and wires are damaged and make sure they are correctly connected to corresponding interface. 2, 3. Ensure there is video on output devices. 3, 4. Check the receiver is correctly connected to display equipment. 4, 5. Make sure all devices are working on supported distance. Draw them closer and try it again. |
Power LED off | 1, Make sure the power adaptor is correctly connected and the voltage is 5V3A 2, Make sure the power supply would not be interrupted. 3, Make sure transmitter is fully powered. |
Receiver video indicating LED abnormal | 1, Make sure video and audio signals can be transmitted to receiver successfully. 2, If there are video and audio signal on output devices, please check the indicating LED to see if something got wrong with it. 3, Make sure the device is working within the supported distance. |
Bad picture | 1. Ensure there is video on output devices. 2. Check if the receiver is correctly connected to display equipment and there is no damage on joints and wires. 3. Make sure all devices are working on supported distance. Draw them closer and try it again. |
No sound or bad sound | 1. Restart the transmitter and connect it again 2. Make sure there is no disturbance from the same frequency (4.9~5.9GHz)within 1 meter. |
Register failure | 1. Make sure the amount of registered source devices on display equipment is less than 8. 2. Ensure the distance between transmitter and receiver doesn't exceed supported distance. If it does, make them closer and try it again. Check if source device has been added on display equipment. If it has, delete it and make registration again. |
Connection failure | 1. Ensure the working distance doesn't exceed supported distance. If it does, make them closer and try it again. 2. Make sure source devices have been registered every time after software update. 3. Ensure source devices and display devices have been registered. 4. If failure occurs again, delete all registered information and try it again. |
Other problems | If any other problems occur, please restart the device and make connections again. |


