Arduino Module IIC LCD 20x4 Character LCD Display Module
New 2004 204 20X4 Character LCD Module Display For Arduino
Quick Detail:
is_customized:Yes
Brand Name:sindax oem
Type:LCM
Model Number:2004
Quality: Brand new
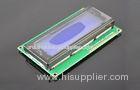
Display:4-lines X 20-characters
Interface:IIC/I2C/TWI
Pin Definition:GND,VCC,SDA,SCL
Supply voltage:5V
PCB Size:98X60MM
Contrast Adjust:Potentiometer
Package:IIC/I2C/TWI 2004 Serial LCD Module 1pcs
Description:
The latest IIC LCD2004-character LCD display module, a new high quality 4 line 20 character LCD module not only set the contrast control knob selector switch also has a backlight and IIC communication interface. For Arduino beginners, not for the cumbersome and complex LCD driver circuit connection and a headache, the real significance of this LCD module will simplify the circuit, this module directly into the Arduino Sensor Shield V5.0 sensor expansion board IIC device interface can, GM 4P sensor connection cable, programmed through the Arduino controller, you can easily identify the slogan, sensor data records.
Specifications:
Use your solderless breadboard and wire jumpers to make these connections:
|
LCD Pin |
Connect to |
|
1 (VSS) |
GND Arduino pin* |
|
2 (VDD) |
+ 5v Arduino pin |
|
3 (contrast) |
Resistor or potentiometer to GND Arduino pin* |
|
4 RS |
Arduino pin 12 |
|
5 R/W |
Arduino pin 11 |
|
6 Enable |
Arduino pin 10 |
|
7 No connection |
|
|
8 No connection |
|
|
9 No connection |
|
|
10 No connection |
|
|
11 (Data 4) |
Arduino pin 5 |
|
12 (Data 5) |
Arduino pin 4 |
|
13 (Data 6) |
Arduino pin 3 |
|
14 (Data 7) |
Arduino pin 2 |
|
15 Backlight + |
Resistor to Arduino pin 13** |
|
16 Backlight GND |
GND Arduino pin* |
*Use a breadboard rail to make multiple connections to the Arduino GND pin
*For potentiometer connection, use the potentiometer's center pin and either of the other pins to make the connection from LCD pin 3 to Arduino GND
** A current limiting resistor or potentiometer (40 Ohm minimum) should be used to avoid excessive current. It should look something like this:
Software